Introduction to the DOM
How can we use the power of the DOM to make our HTML pages more dynamic?


Photo by Simon Wilkes on Unsplash
One of the big things that JavaScript allowed developers to do was to make the HTML page more interactive and dynamic. So as JavaScript developers we need to understand how we can communicate and interact with our applications HTML page(s). This is where the power of the DOM, with its properties and methods really help us shine. So, what is it?
What is the DOM?
In web development, DOM stands for Document Object Model. It is a programming interface that allows us to create, change, or remove elements from the document. More explicitly we have the ability to add new HTML elements, add events, manipulate element styling or modify/change content on existing elements. All these abilities make our HTML pages dynamic, thanks to the DOM!
You may often hear the DOM described as a tree-like representation of the web page that gets loaded by the browser window. Let's take a look at what they mean by that.
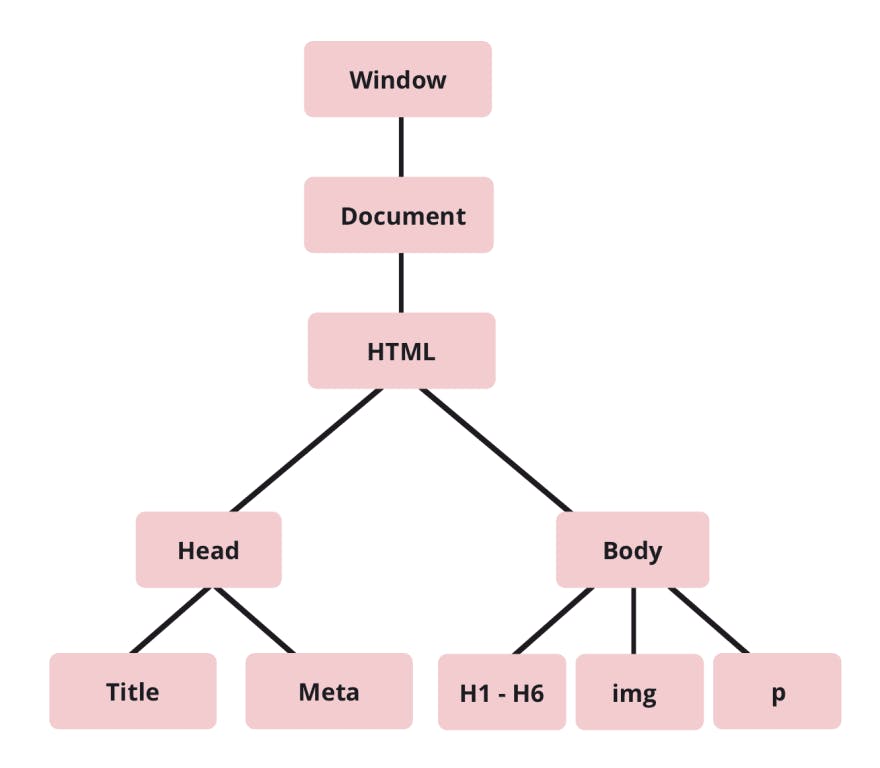
The Document Object
The topmost node in our upside down tree is referred to as the Root node in our DOM tree. This root node or document object has properties and methods that we can use to traverse, control and manipulate the DOM to suit our needs. Let's start to explore some of the most common methods and properties that we as web developers often use.
Selecting an HTML element:
One of the most important first steps that is often confusing to new students is the importance of making sure you have selected or GRABBED a reference to an element that currently exists in our HTML page. What do I mean by this?
To get started we are going to look at two of the most commonly used methods, getElementById() and querySelector()
Let's look at some code, shall we? I think this will help us make that visual connection in our head to this concept.
<!-- filename : index.html -->
<!DOCTYPE html>
<html lang="en">
<head>
    <meta charset="UTF-8">
    <meta http-equiv="X-UA-Compatible" content="IE=edge">
    <meta name="viewport" content="width=device-width, initial-scale=1.0">
    <title>Document</title>
    <link rel="stylesheet" href="./styles.css">
</head>
<body>
    <div class="container">
        <h1>Welcome!</h1>
        <h2>Title: <span id="title">temp content</span></h2>
        <button class="btn">Click Here</button>
    </div>
    <script src="./scripts.js"></script>
</body>
</html>
// filename --> scripts.js
// Here we are just grabbing a few different elements from our index.html page and logging the referenced object to the console.
// Copy both of these files over and run it in your browser, don't forget to open up your console in the inspector dev tools!!

let welcome = document.querySelector("h1");
console.log(welcome);

let title = document.querySelector("h2");
console.log(title);

let container = document.querySelector(".container");
console.log(container);

let content = document.getElementById("title");
console.log(content);
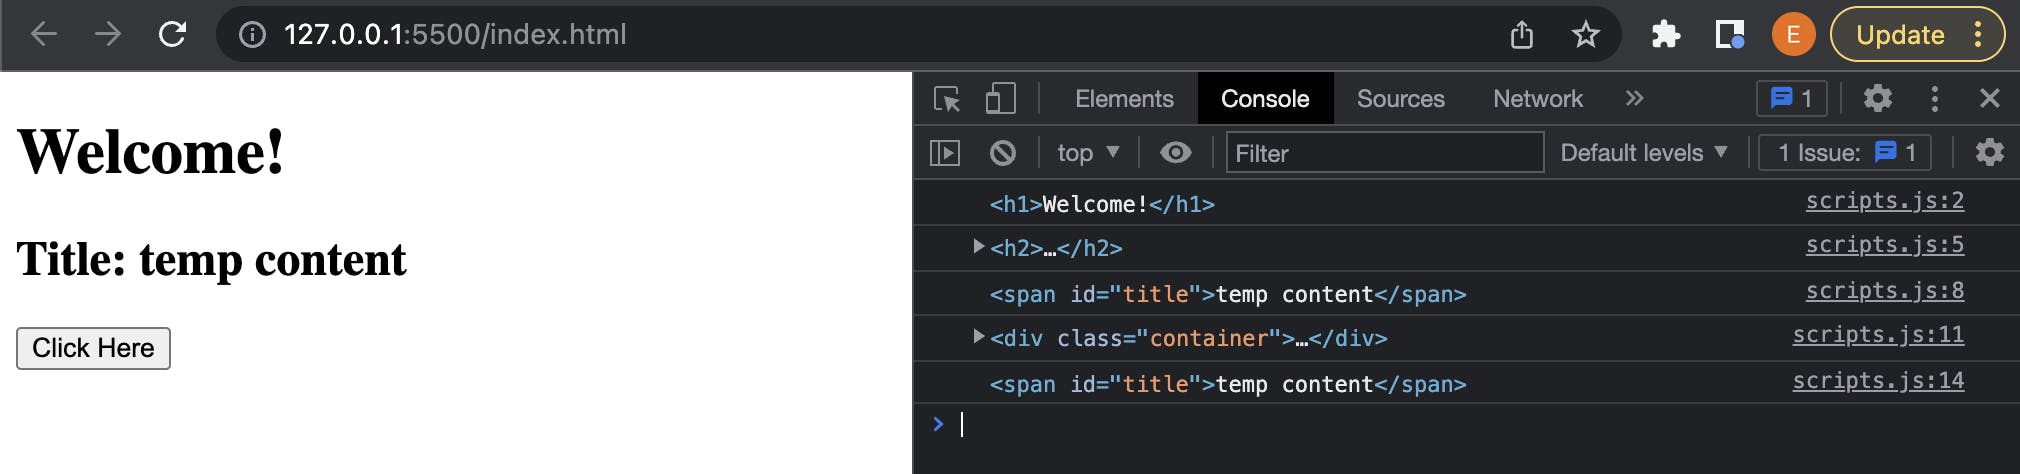
Try copying the code from both of these files over into your own code editor and try it yourself. Best way to learn is to follow along yourself and then experiment!!
Here is what your output should look like:
Let's talk about what is happening in the code that we have so far.
We created a basic HTML page, I named mine index.html, with a CSS stylesheet and JavaScript file connected as well as a few straight forward elements with attributes within our tags. Now in our JavaScript file, if we want to be able to manipulate or change an element that currently exists within our index.html page then we need to have some way or means of selecting or I like to say grabbing a reference to that element that we are interested in. Because we often times have dozens and dozens or hundreds upon hundreds of different HTML elements on our pages, we need a way to differentiate between them as well. It is often good to think about how we pair some of the attributes, like id's and classes together when we are working with both HTML and JavaScript files. Little did you know that we can also use HTML attributes to our advantage within our JavaScript code. HTML attributes, not just for CSS anymore.
First up document.querySelector(<element_descriptor>). So what does this method do for us? We always start with document as that object is the representation that our browser creates from the HTML file. Next the querySelector() method allows us to pass in an argument, in string format, that matches an existing element currently on the DOM. We can see from the code that we can use it in a few different ways. First we create a variable to hold a reference to the element that we want to be able to act on. Next we assign our new variable to an existing HTML element by GRABBING the reference to it. The querySelector() method returns the first element that matches a CSS selector or null if there are no matches. Open up your console and we can see/verify that we are grabbing each reference respective to the CSS selector we pass in as an argument. Above we now have references to the <h1> and <h2> tags, we also have a reference to the <div> with a class attribute of "container".
Uhhh... Question: Why do we start with
documentbefore each method?
Remember when the web browser reads and sets up our HTML page, it creates a Root Object with all the properties and methods that we can use to manipulate the DOM which we refer to as the document.
When an HTML document is loaded into a web browser, it becomes a document object.
The document object is the root node of the HTML document.
The document object is a property of the window object.
The document object is accessed with: window.document or just document
We could do the same thing with an HTML element that had an "id" attribute, like the <span id="title"> element does in our index.html file. In fact grabbing a reference to an element that has an "id" attribute is so common that they provide us a handy-dandy method getElementById("id_descriptor"). The nice thing about this method is it tells you right in the name what type of element selector we are looking for, which also means we don't have to include the hash(#) symbol when specifying the selector we are targeting, like we would if we choose to use document.querySelector("#title").
I have no doubt developers with more experience than myself have their own preferences or more in-depth knowledge about when and why you would chose one method versus the other. But while you are just getting started learning about how these methods work, just start with which ever makes the most sense to you and go build some cool stuff. You will have plenty of time to learn more about the nuances as well as dozens and dozens of other built-in properties and methods available.
Now what if we have several HTML elements, say a bunch of <li> tags in an unordered list, that we want to effect all at once, or even just a selection of them. We also have a method by the name of querySelectorAll() that we can use to help us out.
<!DOCTYPE html>
<head>
    <title>Document</title>
    <link rel="stylesheet" href="./styles.css">
</head>
<body>
    <div class="list">
        <p>List Demo</p>
        <ul>
            <li class="one">One</li>
            <li class="two">Two</li>
            <li class="three">Three</li>
            <li class="four">Four</li>
            <li class="five">Five</li>
        </ul>
    </div>
    <script src="./scripts.js"></script>
</body>
</html>
let listInfo = document.querySelectorAll("li");
console.log(listInfo);
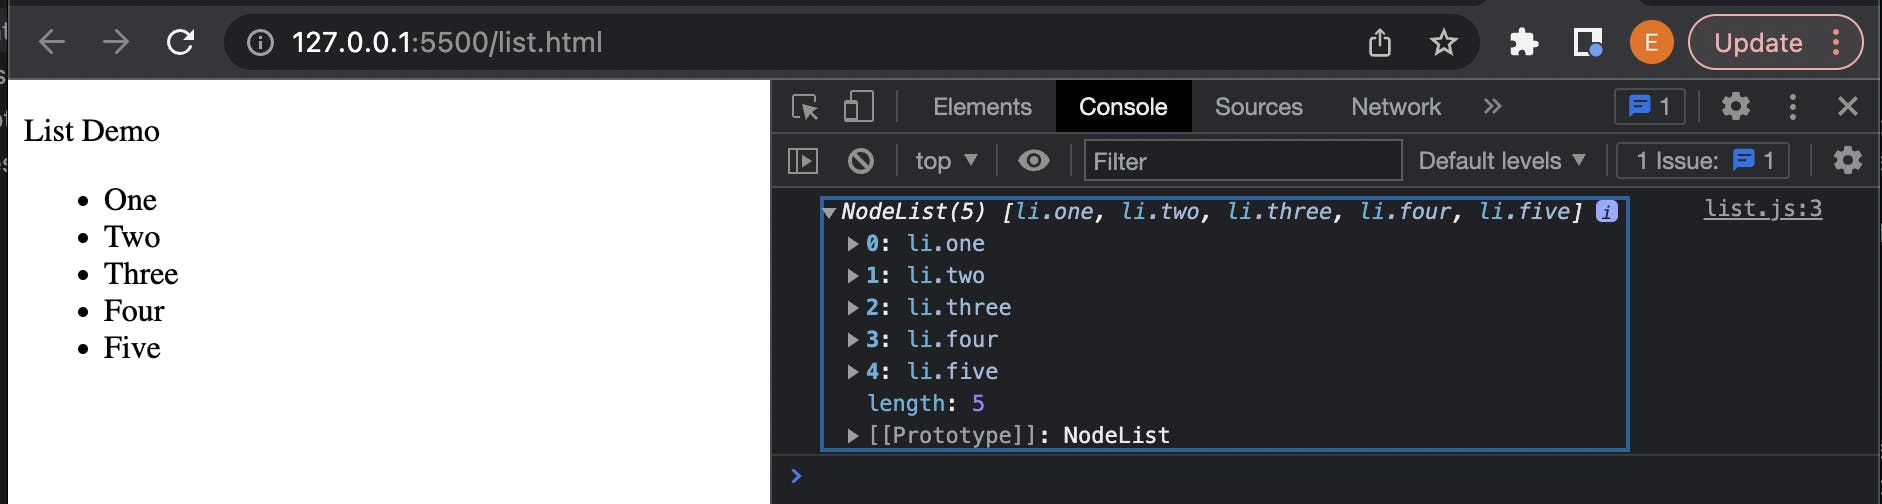
querySelectorAll() takes in the same CSS selector argument types that we use with querySelector(), but instead of returning only the first occurrence of specified element, we get back an Array (more specifically a NodeList with each elements object representation) containing all matching elements.
Why might an array of elements be useful you ask? What if we wanted to be able to highlight or select any elements in our list or a table of data that filters out or matches values that we run through some function logic. Maybe we want to add a striped colored background to the list by targeting the even/odd numbered indexes. Perhaps we want to see all bank accounts with savings of $50,000 or more (must be nice right?), or maybe we want to see who ordered an item from our e-commerce shop in the last 3 months and send them a coupon. Whatever your needs or requirements are we have ways of solving the problem.
We have covered what the DOM is and how it is typically represented as a tree structure, as well as how we can start making the connection between the HTML and JavaScript pages by creating a variable in JS and assigning it the reference to an object on the DOM representation of the HTML. We are going to end things there for the moment, and in the next article we will go into what are DOM Nodes, and how can we use them to navigate around the DOM tree?